Rolling Cups: Modeling in Geometry

The Rolling Cups task from the Shell Center is a perfect geometry modeling project. I use some form of this task every year for the last three days of the first semester as a final project. This task incorporates constructions, similarity, functions and modeling while pre-assessing students readiness for next semester’s content: solids and circles.

Here is this link to the Formative Assessment Lesson

I’ve discovered that this activity is most effective when I have students produce something each of the 50 minute class periods. Over the years, I have been collecting a wide variety of cups from Goodwill, which I keep in a giant tote in the basement of my school.

With finals complete and students’ motivation dwindling, Rolling Cups is the perfect way to make the most of the days right before break. I move all of the chairs and desks out of the way that we have a big open space in the middle of the class. I also make sure students can easily access the dry erase boards on all of my walls to encourage teamwork and collaboration (more on vertical dry erase boards).

Here is how I break up this activity-

Day 1: Experiment

Here are 4 cups. What will happen when I roll them? Which one will make the biggest circle? Which one will make the smallest? Try it.

I hand each student a different cup and this sheet below to guide their thinking and keep them on task, and then I get out of the way.

At some point during this class period I also show students the Rolling Cup Calculator. I put a link in Google Classroom for easy access. Most students use it on their cell phones to try to find patterns.
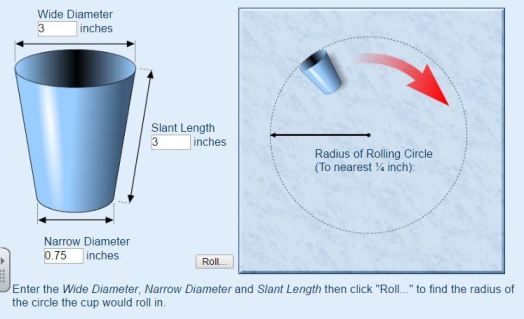
capture

Day 2: Develop an equation

This is the formula derivation day. I start by not mentioning the cups at all and just playing a quick whiteboard game reviewing similarity.

During this task, I usually have a few students suddenly yell out:

“This is the cup thing!”…and then start sketching cups on their whiteboards and they begin to use similar triangles to determine the roll radius.

Here is a discussion I had with a student, trying to support their thinking:

Other students look at the first group like they are crazy and we just carry on.

Then I have a few students summarize what they’ve noticed from the previous class.  Next I hand out this sheet: side 1 is the original task and side 2 is for students to write a few sentences summarizing their findings, and score themselves. My school has been working to develop a structure and rubric to elicit quality student writing about mathematics. Below is the current format.


As I present this sheet to students and summarize the expectations for the day, I also tell them that I made a deal with another teacher on Twitter and that I will be scanning their work and sending it to this teacher in Ohio.

I make a big deal about them not writing their names on the back of the sheet where they describe their thinking because that is the side I am going to send to Ohio and I want to preserve their anonymity. In return, I explain, the class in Ohio will be sending me their work, which we will look at tomorrow.

The quality of students work is so much better when they think it will be analyzed by someone else. Of course, this is a big fat lie. I don’t have any plan to send their work to another teacher. But they do so well with this added piece of motivation.

Day 3: Critique other students work

This day goes pretty much as described in the original task. Students review the included samples of other students work and analyze it answering the well written questions from the original task linked above.

It is fun for students to see that other students in other parts of the country approached the problem the way they did. They get excited and genuinely interested. They begin to reflect on their approach and compare it to the student work provided. You can see their confidence grow a little when they recognize that their (alternative school) work is just as good, if not better than the work of typical students in Ohio.

Geometry Planning Guide

Click here to access and comment on the Geometry Planning guide

Units:

  1. Constructions
  2. Congruence
  3. Transformations & Similarity
  4. Right triangles & Coordinate Proof
  5. Applied Trigonometry & Solids
  6. Circles

In the spirit of Geoff Krall’s Problem Based Curriculum Maps, I attempted to organize my geometry curriculum and learning targets along with associated activities, tasks & lessons. In order to keep this as a useful document, I tried to only include the tasks that I have actually used in my geometry classes. I am interested in adding & deleting from this document regularly to keep if useful for me (and hopefully others). I plan to have the second semester completed this summer, as I am trying to develop this as I go this school year. 

[update 7/25/16: It is finally completed!]

I have shamelessly stolen from all over the MTBoS, Math Vision Project, Engage NY & the Unit Blueprints Project and tried to give credit as much as possible.

Please share any criticisms, activities that I should add, activities that are misaligned, etc… in the comments.

Sprinkler System Design

After determining how to write the equations of circles through the Shell Center activity: Equations of Circles 1, my students needed to practice using equations of circles. I decided to find my high school on Google Maps and make a screenshot. I then imported the screenshot into Desmos and adjusted the size of the image so that 1 unit = 1 foot in my image. I shared the link using google classroom, but it could be shared in any way that you choose.


I had students submit the link to their final design using a google form, the response spreadsheet made it simple to manage and grade.

Capture

The assignment was to design a sprinkler system that covered all of the grass, at a minimum cost. I researched commercial sprinkler systems and found that the maximum radius of a sprinkler is 15 feet. Here are some students designs (click on the image to go to Desmos):


Next year I want to provide students with a list of pricing per foot for trenching, sprinkler pipe, heads for various radii, control box and also require that they calculate the cost for their design. I also want to require that they draw in the underground piping which would allow students an opportunity to review linear equations and piece wise functions as well. Additionally, calculating costs would force students to apply distance to find lengths between the sprinkler heads too.

[update 7/10: Desmos made a formula to calculate pipe length! I could have students explain what this formula does. click on the image to go to Desmos.]

Squares, Area & The Pythagorean theorem

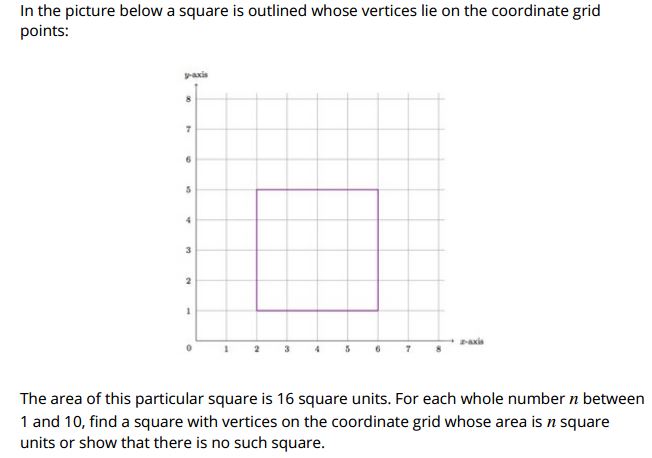
After a few days working on surface area, I wanted to challenge my students and address the standard listed below by with a task that applied area in a different context. I debated about using this task because I couldn’t envision how I would engage students and encourage them to persist in proving that a square of certain areas on a coordinate grid is not possible.

HSG-GPE.B.7: Use coordinates to compute perimeters of polygons and areas of triangles and rectangles, e.g., using the distance formula.

Here is the task from Illustrative math (click on the image below to go to their site)

Capture

I started class by providing each student with a grid whiteboard and marker and I asked them if they could draw a square whose area is 1 square unit. They did this with no problem and sat looking at me like I was crazy.

Next, I asked if it was possible to draw a square whose area was 2 square units, with the corners on the grid. Common student responses below:

  • “It’s impossible!”
  • student draws a 1 x 2 rectangle
  • student grabs calculator and computes the square root of 2, then attempts to draw a square with sides measuring exactly 1.41421356 units long.
  • student divides 2 by 4 draws a square with sides 1/2 a square long, then realized its area is 1/4.
  • student divides 2 by 2 and draws a 1 x 1 square, realizes this is their square with an area of 1.

So THIS is what Robert Kaplinsky means when he talks about Depth of Knowledge! It was very insightful to show student understanding of squares, length, area, and what a square unit means.

Eventually a few students said they figured it out, and were so excited to explain to me how they knew it was a square and how they know its area was 2 square units.

I asked students to try drawing a square with integer each area from 1-10 & students were engaged all period. We kept track of the areas that students thought were not possible.

2015-03-16 10.23.50

The next class period I gave students whiteboards and a sheet of graph paper. I asked them to draw the squares that they could, and also determine the length of each side, and then double check the area using the formula for the area of a square to ensure that their graphic solution matched their calculated area.

2015-03-16 09.56.13

After about 20 minutes I asked the class if they noticed anything about the relationship between the side lengths and the areas of the squares. Many said it appears that if the area is x, then the side length is the square root of x. AHA!

With additional discussion students were able to explain that since there are no pair of integers squared that sum to 3, 6, or 7 it is impossible to draw a square with those areas whose corners were on the grid. I also asked students what would be areas of the next 3 largest squares that would be possible to draw.

They were able to tell me and explain how they knew!

2015-03-16 16.04.01

Through this task students learned more than I possibly could have taught them through 2 days of direct instruction and drill like practice. Students developed a more intuitive understanding of:

  • perpendicular lines having opposite reciprocal slopes
  • the meaning of slope
  • the Pythagorean Theorem
  • area
  • properties of squares
  • squaring & square roots
  • proof.

Annie was right in saying that teachers who argue that there is no time to implement these tasks with such a jam packed curriculum are missing the point. I have to constantly remind myself, that the hurrier I go the behinder I get!

My “Explore The MTBoS” Homework

I have been avoiding posting because I feel like I have to share THE BEST open ended problem. I am positive that about 2 hours after writing this post, I’ll think of one that I like better, and I’ll be mad at myself. But I said that I would do this, so I’m doing this!

One of my favorites for an entry level algebra or geometry unit on proportions / similarity is this:

“The human body is extremely proportional. Your task is to determine the length of the Statue of Liberty’s torch arm as compared to her nose. Her nose is 4 feet 6 inches. Use your nose and arm measurements to calculate what the measurement of the statue’s arm should be.

Once you have calculated this measurement, find the real length of the Statue of Liberty’s right arm. If your calculation is very different from the actual length, then check your work. Explain possible reasons why your solution is not the exact same as the actual arm length.”

That’s all I tell them. If they ask for help, I ask how many noses they have in their arm. They look mad, then confused, then they get to work. It’s simple, but not really what I would define as open ended since there really is one correct answer. But I do love it!

Another favorite is a task from the Mathematics Assessment Project: Patchwork . It’s a non-linear pattern, but it is presented in a way that students can visualize how the pattern is growing and usually after much struggle they develop a formula that works. Then the fun part is I get to employ the procedure described in the 5 Practices book and allow an opportunity for students to determine that their formulas are equivalent.

Later we develop a formula for the number of diagonals in a polygon and students relate it back to their work with the Patchwork problem.

Thanks Sam, for your rant. I needed that extra rant to get myself to post something!