I Cannot Think When Cheetos are Present

I wanted to make a quick post to remind my future self how the Mathalicious lesson Cheese that Goes Crunch went this school year & how I should adapt it for the future.

The purpose of this activity is to have students develop a method to relate cheesiness to the non-cheesy portion of a crunchy vs puffy Cheeto in order to develop a measurement of which is cheesier & by how much. It is a realistic application comparing surface area to volume.

I have 3 sections of geometry, so I attempted this lesson 3 times, each a little differently – and I’d do this lesson again next year, but with more changes.

In my first class I made a fatal error – I distributed cups to the students and then ran around the room with a giant bag of Cheetos pouring them into each cup. This turned the class into a party. Students sat with Cheetos while not working on anything. BIG MISTAKE. When I tried to engage the class in the lesson there was little buy in or understanding of the goal of this activity and I ended up dragging my class through each component of the activity. While it was completed in the end, it was not understood by students.

Capture

For my next two classes, I set up cups with crunchy & puffy Cheetos in advance and set them out of sight. I introduced the activity and had good discussion and student ideas of which type of Cheeto was more cheesy and why. I didn’t provide them with Cheetos until they had a plan for determining which one was more cheesy and they concluded that the cheese was around the exterior, so the needed to compare surface area to volume.

I also found it pretty amusing how many students felt the need to organize their Cheetos:

2015-04-09 09.40.11 2015-04-09 09.42.54

Overall the activity was a great way to have students apply volume and surface area to a context. Next year I will make this task run more like a 3 act and less like a guided worksheet. I don’t want to tell the students what to think and when. It’s too helpful to tell them to approximate each Cheeto as cylinder and guide them to find the surface area and then the volume, and then find a ratio. Students don’t have the same degree of curiosity and satisfaction compared to them deciding what they need to do themselves.

This lesson took one 45 minute class period, but If I make these adaptations for next year It will most like take two: One period for the initial student question development and calculations and a second for student presentations and possibly time for them to improve or reflect on their work. OR maybe a gallery walk and whole class discussion.

I’ll adapt it like this next year:

Act 1 will beg the question of which type Cheeto has more cheese flavor. I will work through a notice/wonder and develop a main question.

Act 2 will be students determining what information they needed and equating a serving of crunchy Cheetos to puffy Cheetos. Then finding the volume and surface area of an average Cheeto and developing and justifying a method to measure cheesiness.

Act 3 will include student presentations of their analysis effectively sequenced as described in the 5 Practices book and maybe a reveal of how much more cheese powder per volume there are in crunchy vs puffy Cheetos (although this may not be necessary).

This task is a great idea and is worth doing with students. I think I struggled with its implementation because I did not develop enough student buy in and understanding of the question from the start – which I continue to be reminded is a critical component to successful student problem solving.

Squares, Area & The Pythagorean theorem

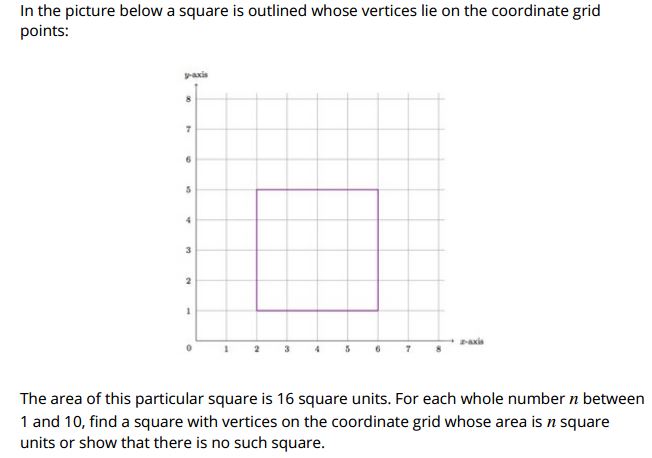
After a few days working on surface area, I wanted to challenge my students and address the standard listed below by with a task that applied area in a different context. I debated about using this task because I couldn’t envision how I would engage students and encourage them to persist in proving that a square of certain areas on a coordinate grid is not possible.

HSG-GPE.B.7: Use coordinates to compute perimeters of polygons and areas of triangles and rectangles, e.g., using the distance formula.

Here is the task from Illustrative math (click on the image below to go to their site)

Capture

I started class by providing each student with a grid whiteboard and marker and I asked them if they could draw a square whose area is 1 square unit. They did this with no problem and sat looking at me like I was crazy.

Next, I asked if it was possible to draw a square whose area was 2 square units, with the corners on the grid. Common student responses below:

  • “It’s impossible!”
  • student draws a 1 x 2 rectangle
  • student grabs calculator and computes the square root of 2, then attempts to draw a square with sides measuring exactly 1.41421356 units long.
  • student divides 2 by 4 draws a square with sides 1/2 a square long, then realized its area is 1/4.
  • student divides 2 by 2 and draws a 1 x 1 square, realizes this is their square with an area of 1.

So THIS is what Robert Kaplinsky means when he talks about Depth of Knowledge! It was very insightful to show student understanding of squares, length, area, and what a square unit means.

Eventually a few students said they figured it out, and were so excited to explain to me how they knew it was a square and how they know its area was 2 square units.

I asked students to try drawing a square with integer each area from 1-10 & students were engaged all period. We kept track of the areas that students thought were not possible.

2015-03-16 10.23.50

The next class period I gave students whiteboards and a sheet of graph paper. I asked them to draw the squares that they could, and also determine the length of each side, and then double check the area using the formula for the area of a square to ensure that their graphic solution matched their calculated area.

2015-03-16 09.56.13

After about 20 minutes I asked the class if they noticed anything about the relationship between the side lengths and the areas of the squares. Many said it appears that if the area is x, then the side length is the square root of x. AHA!

With additional discussion students were able to explain that since there are no pair of integers squared that sum to 3, 6, or 7 it is impossible to draw a square with those areas whose corners were on the grid. I also asked students what would be areas of the next 3 largest squares that would be possible to draw.

They were able to tell me and explain how they knew!

2015-03-16 16.04.01

Through this task students learned more than I possibly could have taught them through 2 days of direct instruction and drill like practice. Students developed a more intuitive understanding of:

  • perpendicular lines having opposite reciprocal slopes
  • the meaning of slope
  • the Pythagorean Theorem
  • area
  • properties of squares
  • squaring & square roots
  • proof.

Annie was right in saying that teachers who argue that there is no time to implement these tasks with such a jam packed curriculum are missing the point. I have to constantly remind myself, that the hurrier I go the behinder I get!

Surface Area Interactive Notes

I gave this sheet to students and had them cut out the nets and use a ruler to measure and calculate the area of each face.

Then we folded on the dashed lines and taped only 1 face into our Interactive notes, adding any additional information next to the net.

This is one of my favorite notebook pages because students refer back to it often to help them visualize all of the faces of 3-d solids in later practice.

2015-03-18 16.11.54 2015-03-18 16.12.10 2015-03-18 16.12.16 2015-03-18 16.12.42 2015-03-18 16.12.55 2015-03-18 16.13.01  2015-03-18 16.13.44

Introducing Surface Area with Pop Box Design

After sharing this activity on last nights Global Math Department meeting (recording here), I thought I should also post it here.

I came across the Pop Box Design task developed by Timon Piccini and knew it would be a good fit for my students.

My students needed to understand surface area, not just be able to use formulas. I’m proud that during this activity I didn’t say surface area once.

I started by playing Timon’s Act 1 of this task and allowing time for students to notice & wonder about the short video. Then students predicted which box uses less cardboard (lower left of board).

2015-03-04 10.18.40

We spent the remainder of the period playing with cm cubes and reviewing the meaning of and difference between surface area & volume using the worksheet attached in Timon’s 3 act.

2015-03-17 05.56.12 2015-03-17 05.56.23

The next class, I provided 12 pack boxes of each shape and put them in students hands, asking again – Which one uses more cardboard?

2015-03-16 14.30.442015-03-16 14.31.03

Students grabbed rulers and got to work finding area. They asked if they should be using inches or centimeters. I responded by asking which one requires more cardboard?

2015-03-16 16.13.532015-03-16 16.13.45

Once students determined the amount of cardboard used for each box, they logged into Google Classroom and wrote a letter to either soda box manufacturer or to me sharing their work, conclusions & recommendations:

letter1 letter2 letter3

The Good

  • Using Google Classroom to manage letters & provide feedback. Students are still revising their letters.
  • Illustration of surface area, we’ve referred back to this as we dug deeper into more advanced surface area problems.
  • Physically touching & measuring the boxes increases buy in, engagement & understanding.

Change for next time

  • Work with the class to develop a list of key elements to include in the letter.
  • Some facts on cost of cardboard, ink, production & environmental impacts to increase relevancy.
  • Improve connection between cubes & cardboard task. Some students did not see how these were related.

This task was a good, efficient way to ensure that students understand what surface area means and not just develop their ability to calculate surface area. As we practiced more advanced surface area problems, students were more understanding of what they were doing and was better able to develop formulas to find surface areas of a variety of  solids.

Day 126: Starting Spiky Door Project

An awesome Mathalician, Kate Nowak, commented on a blog post with a link to a project that she did with her students: Spiky Door!

This fit perfectly with my students and their needs. I was surprised how much they struggled getting started. They wanted more specific steps, they really had a hard time with the difference between slant height and height. I taped paper into some plastic solids that I have and it helped students understanding. Today they just planned their figure and made a scale drawing, tomorrow they build. I’m surprised how challenging this is for students!

2014-04-07 13.53.40

Day 122: intro to surface area

A lot of students struggle with picturing 3d solids printed in 2d. I decided to start surface area by having students build the figures and compute areas by measuring. Additionally, I want them to understand surface area and what it measures instead of just plugging values into formulas. Hopefully this will give them a point of reference when we move on to more advanced surface area problems. The homework is to complete the examples in their interactive notes.

2014-04-01 14.42.33 2014-04-01 14.42.54 2014-04-01 14.43.01