Geometry Right Triangles unit project: Barbie Zipline Day 3

This is the conclusion of a three day lesson applying right triangles. Here is day 1 and day 2.  Eric is my apprentice teacher and he initiated this discussion:

Eric: Yesterday we prepared to go outside, what information did we collect?

student: How much rope we need and what angle.

Eric: Where is the angle? Here or here? What else did we find?

2018-02-08 10.32.48

student: The height of the flagpole.

student: The distance away from the flagpole

Eric: One person from each group come up to the board and write your angle and distance from the flagpole on the board.

Eric: Let’s make a plan before we go outside.

2018-02-08 10.40.29

We then discussed and agreed that we should actually measure the height of the flagpole  when we put barbie on the pole. We also decided to find the exact ground distance to create a 30 degree angle, but that it looks like it should be approximately 45 feet from the base of the flagpole. Students also agreed that they would like to confirm their thinking that this angle will result in a safe speed for Barbie to zipline down from the top of the flagpole.


The Wrap Up

Eric made a sheet for students to reflect on the lesson.

2018-02-09 10.55.402018-02-09 10.57.262018-02-09 10.58.38

Geometry Right Triangles unit project: Barbie Zipline Day 2

Students sat with their partners from Barbie zipline day 1 and we begin by reviewing the scenario and their calculated flagpole height.

Next we discussed how this zipline will work. I used a string and a binder clip to make a model zipline, using a very steep slope for the zipline and I asked students to predict what would happen if Barbie came down a zipline like this.  They agreed that she would fall too fast and get hurt. Next, I held the string almost horizontal and asked how this zipline would work – and students agreed that she would get stuck or mover too slowly.

I explained that the goal for this day is to use a model in class to determine a plan for Barbie to zipline down safely from the top of the flagpole. By the end of class, students had to know what angle of elevation they planned to use and how far from the base of the flagpole they needed to place the end of the zipline.

This day felt a little chaotic, but students did end up finding errors in their measurements by verifying their calculations in a variety of ways. The worksheet below incorporated a range of geometry topics including:

  • Pythagorean Theorem
  • right triangle trigonometry to calculate lengths
  • inverse trigonometric functions to determine angles
  • similar triangles

Tomorrow, we test our calculations outside on the the flagpole.

Barbie is harnessed and ready!


Geometry Right Triangles unit project: Barbie Zipline Day 1

I have seen posts about Barbie zipline on occasion over the past few years. I’ve avoided the lesson because it seemed like a lot of advance prep work and typically I don’t allow enough time plan this far ahead and work through constructing a zip line trial run to make sure it all works in advance. To keep it completely real, I also hadn’t seen any description or resources that I thought would fit my classes well. But I found myself approaching the end of a right triangle unit in geometry with 2 full block periods mapped on my unit plan labeled “Right triangle synthesis project – need to create.”

This is my first semester with a full time apprentice teacher, Eric, so I have help and some new motivation to make this a fun project for everyone this time too. This time of the school year, with short days, cold temperatures and no end in sight, it seems a lot of students appear pretty bored with school and many of the staff here are also struggling. I really just needed to lighten things up for the students and myself. The next logical thought: Queue Barbie and high quality pulleys.

Day 1 (80 minutes): How tall is the flagpole?

The set up

Randomly assign teams (I used pairs)

Introduce the activity with this fantastic video from Jed Butler:

We leaned heavily on Jed’s blog post and started with the activity guides included in his post, modifying them a little to incorporate his thoughts on how the lesson could be improved and our learning goals.

  1. I like having students select a team name because it forces them to talk to each other before they being working with content. It increases collaboration and breaks down barriers with a safe opening topic for conversation.
  2. Given the image below, use Mr. R to estimate the height of the flagpole. This led to students getting rulers and measuring on the image and a rich discussion on whether 4 inches is the same as 0.4 feet. 

  3.   Discussion

    • Eric: What are some ways we could find the height of the flagpole?
      • student: climb up the flagpole?
      • student: find the angle?
    • Eric: What angle?
      • student: The angle of elevation?
    • Eric: Where does the angle of elevation go (sketches diagram)?
      • student: Do we know how tall Ken is?
      • student: Are we Ken in this situation?
    • Eric: What can we measure?
      • student: You could measure the distance from the flagpole to the person.
      • student: We could use that angle tool thing that Mrs. B carries around.
      • student: oooohhhhhh. yeah.
    • Eric: How could we use that? What else would we need to measure? Would we all have the same measurements?
      • student: The adjacent!
      • student: The hypotenuse!
      • student: oh! So we could use tangent.
    • Eric: I want you to measure two different times, switching roles. Why do you think we should do it twice?
      • student: To see if we get the same answer?
    • Eric: Will we all get the same answer?
      • Student:  No.
    • Eric Why not?
      • student: Because it is not exact, but they should be really close.
    • Eric: Work with your group and make a plan before we go outside.

2018-02-06 09.50.51

4.  Measure & Calculate

Outside measurements, then back in for calculations, using this sheet from Jed Butler’s description as a guide.

Favorite question while measuring angles outside:

  • student: Is it possible to get the same angle of elevation if may partner and I are different heights?
  • Eric: What do you think?


5. Enter both of your calculated flagpole heights into the google form (accessed using a bit.ly address from their cell phones).

6.  Justify flagpole height

Project the spreadsheet from the google form as students enter their flagpole heights.

  • Eric: We don’t know the actual height of the flagpole. Here are all of your calculated heights. We need to determine what number to use as the height of the flagpole. What are some was to analyze data?Capture
  • students: average, mean, median, outliers, graphs, range…..
  • Eric:  Determine what height you believe the flagpole is and use one or more of these measures to justify your conclusion.


Day 2: Design a model and calculate angle of elevation, zipline length, and ground distance.

Squares, Area & The Pythagorean theorem

After a few days working on surface area, I wanted to challenge my students and address the standard listed below by with a task that applied area in a different context. I debated about using this task because I couldn’t envision how I would engage students and encourage them to persist in proving that a square of certain areas on a coordinate grid is not possible.

HSG-GPE.B.7: Use coordinates to compute perimeters of polygons and areas of triangles and rectangles, e.g., using the distance formula.

Here is the task from Illustrative math (click on the image below to go to their site)

Capture

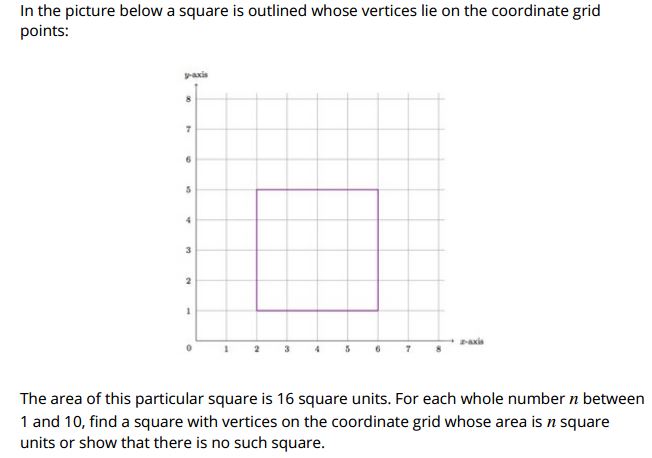
I started class by providing each student with a grid whiteboard and marker and I asked them if they could draw a square whose area is 1 square unit. They did this with no problem and sat looking at me like I was crazy.

Next, I asked if it was possible to draw a square whose area was 2 square units, with the corners on the grid. Common student responses below:

  • “It’s impossible!”
  • student draws a 1 x 2 rectangle
  • student grabs calculator and computes the square root of 2, then attempts to draw a square with sides measuring exactly 1.41421356 units long.
  • student divides 2 by 4 draws a square with sides 1/2 a square long, then realized its area is 1/4.
  • student divides 2 by 2 and draws a 1 x 1 square, realizes this is their square with an area of 1.

So THIS is what Robert Kaplinsky means when he talks about Depth of Knowledge! It was very insightful to show student understanding of squares, length, area, and what a square unit means.

Eventually a few students said they figured it out, and were so excited to explain to me how they knew it was a square and how they know its area was 2 square units.

I asked students to try drawing a square with integer each area from 1-10 & students were engaged all period. We kept track of the areas that students thought were not possible.

2015-03-16 10.23.50

The next class period I gave students whiteboards and a sheet of graph paper. I asked them to draw the squares that they could, and also determine the length of each side, and then double check the area using the formula for the area of a square to ensure that their graphic solution matched their calculated area.

2015-03-16 09.56.13

After about 20 minutes I asked the class if they noticed anything about the relationship between the side lengths and the areas of the squares. Many said it appears that if the area is x, then the side length is the square root of x. AHA!

With additional discussion students were able to explain that since there are no pair of integers squared that sum to 3, 6, or 7 it is impossible to draw a square with those areas whose corners were on the grid. I also asked students what would be areas of the next 3 largest squares that would be possible to draw.

They were able to tell me and explain how they knew!

2015-03-16 16.04.01

Through this task students learned more than I possibly could have taught them through 2 days of direct instruction and drill like practice. Students developed a more intuitive understanding of:

  • perpendicular lines having opposite reciprocal slopes
  • the meaning of slope
  • the Pythagorean Theorem
  • area
  • properties of squares
  • squaring & square roots
  • proof.

Annie was right in saying that teachers who argue that there is no time to implement these tasks with such a jam packed curriculum are missing the point. I have to constantly remind myself, that the hurrier I go the behinder I get!

The Diamond Building

I adapted Jeff De Varona’s Diamond Building lesson into a 3-act task, but instead of having act 3 be a reveal of the actual height, I had students calculate the height a second way to confirm their results. It took 2 short class periods (about 40 mins each) with my struggling students, but it may be able to be completed in 1 class period if you spend less time noticing/wondering/developing questions. I had students work in randomly assigned groups of 2 or 3. They were engaged the entire time and seemed to enjoy the task.

I started by only providing sheets 1 and 2 at first & running it like a typical 3 act. Then I provided “diamond height method” info via projection & allowed students time to work using big whiteboards and share their conclusions. This activity was followed the next day by providing the pages 3 & 4 of the attached file and having students determine the building’s height by the “clinometer method” then discussion of actual height & sources of error.

I used this lesson as a summary to a unit on right triangles, a few days after doing a clinometer activity based on this. My favorite part was listening to students try to determine how to find the height of 1 diamond using only the fact that it is constructed of 2 equilateral triangles with sides length 7 feet. Some students constructed 30-60-90 triangles and used trigonometry, which is exciting because I did not explicitly teach special right triangles in this geometry class. Most students realized they could use the Pythagorean theorem.

2015-03-04 06.28.132015-03-04 06.16.07  2015-03-04 06.33.33

Day 88: Taco Cart! Woo Hooo!

My favorite part of the intro to Taco Cart is when I asked students what information they needed, I’ll only tell them 2 things, and they debated for about 5 minutes. A few students thought the weather would be a factor. Their peers were furious. They decided the distances are more important. We only got started. Tomorrow they will figure it out.  20140121-115357.jpg

20140121-115505.jpg

Day 85: Viewmongus Awesomesauce

Today was so fun! We did a warm up reviewing Pythagorean theorem, then as a class, we worked through finding the dimensions of the 55″ television at the beginning of act 2.

20140115-115527.jpg

Students then worked in small groups to answer and discuss whether an 80″ TV is really more then double the area of a 55″ TV.  There was struggle, success, frustration, persistence, debate. Standards of mathematical practice abound!  Ahh, it was beautiful.

I had a few students who found a more efficient methods for finding the area of each TV:

The student below found the proportional increase from a 55″ to an 80″ and just multiplied the side lengths by the same ratio:

20140115-134412.jpgThis student calculated the area of each “square” in a 16 x 9 TV, then multiplied it by 144, saving him the effort of finding the length of each side and then the area:

20140115-115539.jpg

I love how students develop such smart methods when left to their own devices. Its sad to think of all of the times I’ve stifled that creativity by showing them just one method to solve a problem, instead of equipping students with tools and a good understanding of a problem and allowing them to use the tools as they see fit.