The Rolling Cups task from the Shell Center is a perfect geometry modeling project. I use some form of this task every year for the last three days of the first semester as a final project. This task incorporates constructions, similarity, functions and modeling while pre-assessing students readiness for next semester’s content: solids and circles.
Here is this link to the Formative Assessment Lesson
I’ve discovered that this activity is most effective when I have students produce something each of the 50 minute class periods. Over the years, I have been collecting a wide variety of cups from Goodwill, which I keep in a giant tote in the basement of my school.
With finals complete and students’ motivation dwindling, Rolling Cups is the perfect way to make the most of the days right before break. I move all of the chairs and desks out of the way that we have a big open space in the middle of the class. I also make sure students can easily access the dry erase boards on all of my walls to encourage teamwork and collaboration (more on vertical dry erase boards).
Here is how I break up this activity-
Day 1: Experiment
Here are 4 cups. What will happen when I roll them? Which one will make the biggest circle? Which one will make the smallest? Try it.
I hand each student a different cup and this sheet below to guide their thinking and keep them on task, and then I get out of the way.
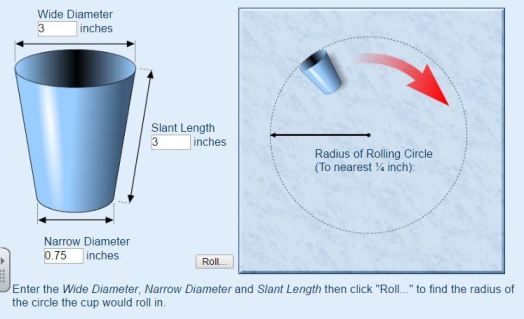
At some point during this class period I also show students the Rolling Cup Calculator. I put a link in Google Classroom for easy access. Most students use it on their cell phones to try to find patterns.
Day 2: Develop an equation
This is the formula derivation day. I start by not mentioning the cups at all and just playing a quick whiteboard game reviewing similarity.
During this task, I usually have a few students suddenly yell out:
“This is the cup thing!”…and then start sketching cups on their whiteboards and they begin to use similar triangles to determine the roll radius.
Here is a discussion I had with a student, trying to support their thinking:
Other students look at the first group like they are crazy and we just carry on.
Then I have a few students summarize what they’ve noticed from the previous class. Next I hand out this sheet: side 1 is the original task and side 2 is for students to write a few sentences summarizing their findings, and score themselves. My school has been working to develop a structure and rubric to elicit quality student writing about mathematics. Below is the current format.
As I present this sheet to students and summarize the expectations for the day, I also tell them that I made a deal with another teacher on Twitter and that I will be scanning their work and sending it to this teacher in Ohio.
I make a big deal about them not writing their names on the back of the sheet where they describe their thinking because that is the side I am going to send to Ohio and I want to preserve their anonymity. In return, I explain, the class in Ohio will be sending me their work, which we will look at tomorrow.
The quality of students work is so much better when they think it will be analyzed by someone else. Of course, this is a big fat lie. I don’t have any plan to send their work to another teacher. But they do so well with this added piece of motivation.


Day 3: Critique other students work
This day goes pretty much as described in the original task. Students review the included samples of other students work and analyze it answering the well written questions from the original task linked above.
It is fun for students to see that other students in other parts of the country approached the problem the way they did. They get excited and genuinely interested. They begin to reflect on their approach and compare it to the student work provided. You can see their confidence grow a little when they recognize that their (alternative school) work is just as good, if not better than the work of typical students in Ohio.


