This is the conclusion of a three day lesson applying right triangles. Here is day 1 and day 2. Eric is my apprentice teacher and he initiated this discussion:
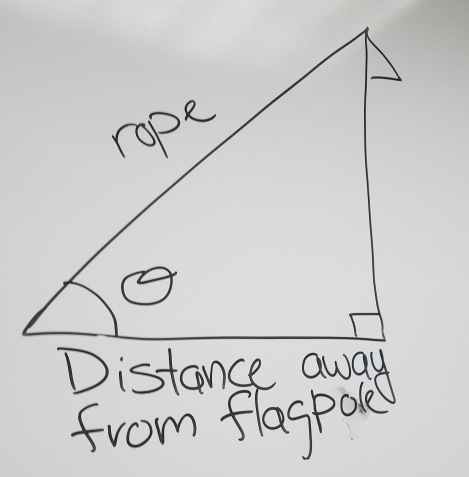
Eric: Where is the angle? Here or here? What else did we find?
student: The height of the flagpole.
student: The distance away from the flagpole
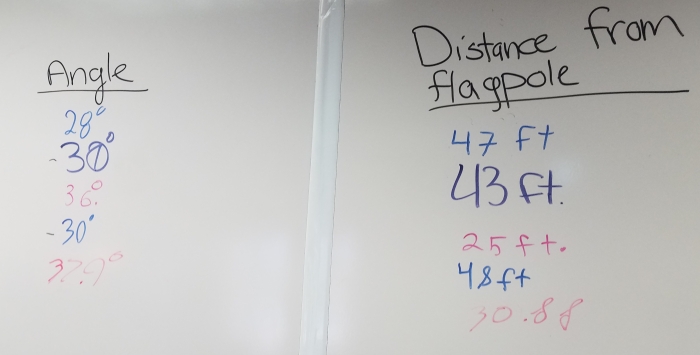
Eric: One person from each group come up to the board and write your angle and distance from the flagpole on the board.
Eric: Let’s make a plan before we go outside.
We then discussed and agreed that we should actually measure the height of the flagpole when we put barbie on the pole. We also decided to find the exact ground distance to create a 30 degree angle, but that it looks like it should be approximately 45 feet from the base of the flagpole. Students also agreed that they would like to confirm their thinking that this angle will result in a safe speed for Barbie to zipline down from the top of the flagpole.
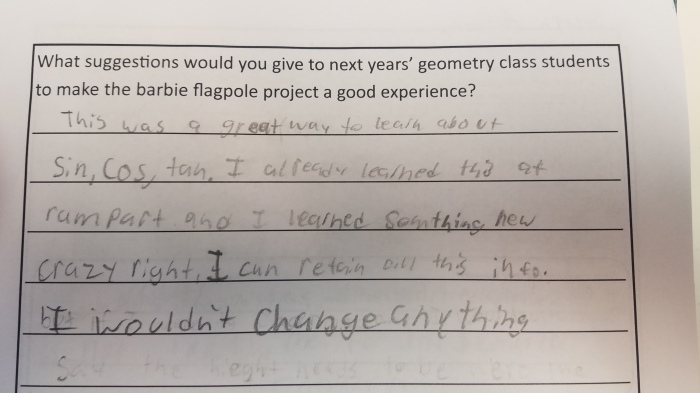
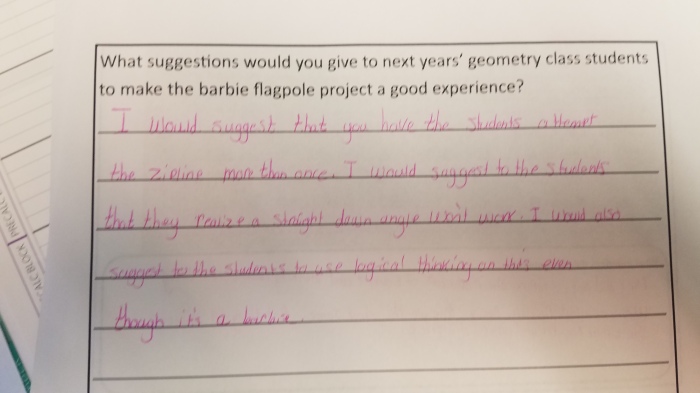
The Wrap Up
Eric made a sheet for students to reflect on the lesson.
Students sat with their partners from Barbie zipline day 1 and we begin by reviewing the scenario and their calculated flagpole height.
Next we discussed how this zipline will work. I used a string and a binder clip to make a model zipline, using a very steep slope for the zipline and I asked students to predict what would happen if Barbie came down a zipline like this. They agreed that she would fall too fast and get hurt. Next, I held the string almost horizontal and asked how this zipline would work – and students agreed that she would get stuck or mover too slowly.
I explained that the goal for this day is to use a model in class to determine a plan for Barbie to zipline down safely from the top of the flagpole. By the end of class, students had to know what angle of elevation they planned to use and how far from the base of the flagpole they needed to place the end of the zipline.
This day felt a little chaotic, but students did end up finding errors in their measurements by verifying their calculations in a variety of ways. The worksheet belowincorporated a range of geometry topics including:
Pythagorean Theorem
right triangle trigonometry to calculate lengths
inverse trigonometric functions to determine angles
similar triangles
Tomorrow, we test our calculations outside on the the flagpole.
I have seen posts about Barbie zipline on occasion over the past few years. I’ve avoided the lesson because it seemed like a lot of advance prep work and typically I don’t allow enough time plan this far ahead and work through constructing a zip line trial run to make sure it all works in advance. To keep it completely real, I also hadn’t seen any description or resources that I thought would fit my classes well. But I found myself approaching the end of a right triangle unit in geometry with 2 full block periods mapped on my unit plan labeled “Right triangle synthesis project – need to create.”
This is my first semester with a full time apprentice teacher,Eric, so I have help and some new motivation to make this a fun project for everyone this time too. This time of the school year, with short days, cold temperatures and no end in sight, it seems a lot of students appear pretty bored with school and many of the staff here are also struggling. I really just needed to lighten things up for the students and myself. The next logical thought: Queue Barbie and high quality pulleys.
We leaned heavily on Jed’s blog post and started with the activity guides included in his post, modifying them a little to incorporate his thoughts on how the lesson could be improved and our learning goals.
I like having students select a team name because it forces them to talk to each other before they being working with content. It increases collaboration and breaks down barriers with a safe opening topic for conversation.
Given the image below, use Mr. R to estimate the height of the flagpole. This led to students getting rulers and measuring on the image and a rich discussion on whether 4 inches is the same as 0.4 feet.
Discussion
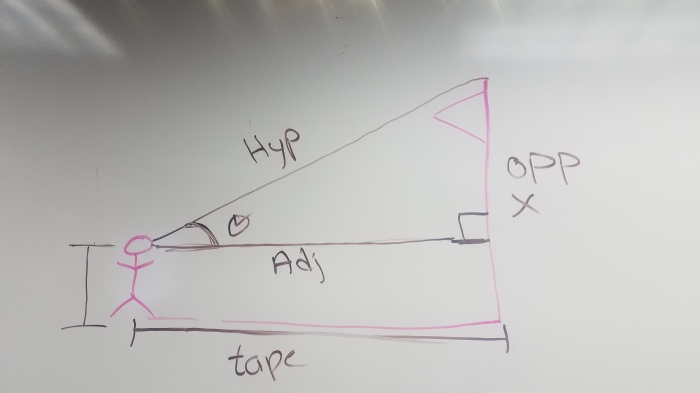
Eric: What are some ways we could find the height of the flagpole?
student: climb up the flagpole?
student: find the angle?
Eric: What angle?
student: The angle of elevation?
Eric: Where does the angle of elevation go (sketches diagram)?
student: Do we know how tall Ken is?
student: Are we Ken in this situation?
Eric: What can we measure?
student: You could measure the distance from the flagpole to the person.
student: We could use that angle tool thing that Mrs. B carries around.
student: oooohhhhhh. yeah.
Eric: How could we use that? What else would we need to measure? Would we all have the same measurements?
student: The adjacent!
student: The hypotenuse!
student: oh! So we could use tangent.
Eric: I want you to measure two different times, switching roles. Why do you think we should do it twice?
student: To see if we get the same answer?
Eric: Will we all get the same answer?
Student: No.
Eric Why not?
student: Because it is not exact, but they should be really close.
Eric: Work with your group and make a plan before we go outside.
4. Measure & Calculate
Outside measurements, then back in for calculations, using this sheet from Jed Butler’s description as a guide.
Favorite question while measuring angles outside:
student: Is it possible to get the same angle of elevation if may partner and I are different heights?
Eric: What do you think?
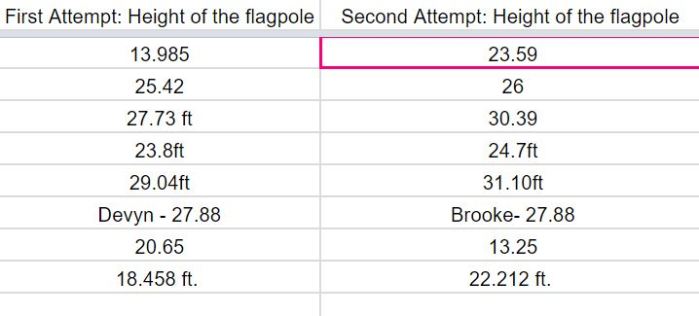
5. Enter both of your calculated flagpole heights into the google form (accessed using a bit.ly address from their cell phones).
6. Justify flagpole height
Project the spreadsheet from the google form as students enter their flagpole heights.
Eric: We don’t know the actual height of the flagpole. Here are all of your calculated heights. We need to determine what number to use as the height of the flagpole. What are some was to analyze data?
I blogged a few years ago about starting geometry with developing definitions. I’ve made some changes since then, and I have additional ideas for next year that I want to remember.
I’ve found it more useful to start the school year introducing geometry as art, and developing a need for definitions as students struggle to describe the process to create their designs.
Once there is a need for developing agreed upon definitions for terms, I want to use this video to motivate how and why definitions develop:
To make a definition is to highlight and call attention to a feature or structural property. Historically this comes out of working on a problem, not as a prelude to it. The point is you don’t start with definitions, you start with problems. Nobody ever had an idea of a number being “irrational” until Pythagoras attempted to measure the diagonal of a square and discovered that it could not be represented as a fraction. Definitions make sense when a point is reached in your argument which makes the distinction necessary. To make definitions without motivation is more likely to cause confusion.
Then, students will develop their own terms and definitions (We ended up with of holes, tubes, and bubbles – you can see the fun thread here.) and we can see how complete it is by trying to classify different objects: a sock? a slice of Swiss cheese? a block of Swiss cheese? etc…
We may engage in some form of Attacks and Counterattacks to help students refine their definitions as the situation requires.
After this introduction of what definitions are and how they work, I will use examples and counterexamples for students to work in small groups and develop definitions of other geometry terms, as described here.
I usually use the last six week of the school year in geometry to teach circles: Arc lengths, chords, secants, tangents, etc. Which I have outlined in the Geometry Planning Guide
The following school year students begin Algebra 2 and promptly forget these properties of circles. They also start the new school year frustrated and overwhelmed because they forgot all about the quadratics they learned in Algebra 1 during their year in geometry.
This school year I decided to make some changes to the last unit in order to set students up to be more successful in the transition from Geometry to Algebra 2:
I distributed an index card to each student and gave them students 5 minutes to make a beautiful work of art on the card. When time was up, students turned in their art, I shuffled the cards and redistributed them to the class.
I cut orange paper to the same size as 3×5 inch index cards, and told the students it was “Real Gold” it was very expensive and we could not waste any of it (they referred to orange paper as “Gold” for the rest of the school year). They had to try to make a frame for the art and tape it down to the assignment sheet that I distributed to them with an explanation of their thinking and strategy.
It worked. They begged me to help them find a better way to complete this task.
2) Complete the Square with algebra tiles.
I used this activity from Salt Lake City Schools to guide student thinking. Students worked in small groups to create squares using algebra tiles and relating the squared and factored forms of perfect square quadratic equations. We referred back to this task often throughout the unit.
3) Solving equations by Completing the square notes and practice
I used Sarah Hagan’s foldable for completing the square. The following day I planned a basic practice sheet for students to just build fluency with solving equations by completing the square, but it was so nice out, we decided to do this on the sidewalk instead. (Note: Always keep sidewalk chalk in your classroom for beautiful day emergencies)
4) Applications of completing the square
I returned students framed art task from day 1 above, and they wrote and equation and found the appropriate frame size using completing the square, then measured their estimated solution and reflected on their work.
I printed and laminated sets of the domino cards from the Shell Center task: Representing Quadratic Functions Graphically and students completed the loop and filled in the blanks. They then were able to summarize the relationship between standard, vertex and factored form of a quadratic equation and understand what each of the forms of the equation illustrated about it’s graph.
The next day, students worked on the Desmos Activity: Match My Parabola. I was able to pause and pace this activity as needed and monitor students understanding in order to support students understanding of the various forms of a quadratic equation.
6) Converting a quadratic equation between vertex, standard and factored forms
Now that students understood the usefulness of the various forms of quadratic equations, they wanted to be able to convert a quadratic equation between the various forms:
This slideshow requires JavaScript.
6) Develop the equation of a circle
I started with this question:
There were a few students who shouted out “Pythagorean Theorem!” and students realized they could construct a right triangle and find the length of the hypotenuse/radius.
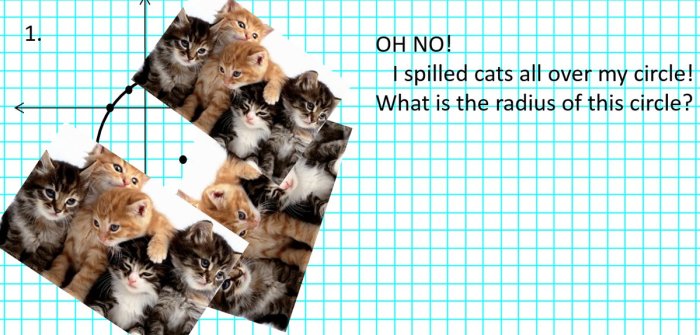
Next, I gave students individual whiteboards and asked them to draw a circle centered at (0,0) with a radius of 5. Then I asked them to name coordinates of points that they know for sure were on the circle and I would have them explain how they knew. Eventually we identified 12 points on the circle.
After this, I asked students what the relationship was between the x and y coordinates on the circle. Most groups were able to explain that they were all related by the Pythagorean theorem because x² + y² = 5².
At this point, I had students complete the first side of the “Going Round in Circles” sheet from this Shell Center lesson in order to see how well students understood the discussion and to see how they could apply their learning.
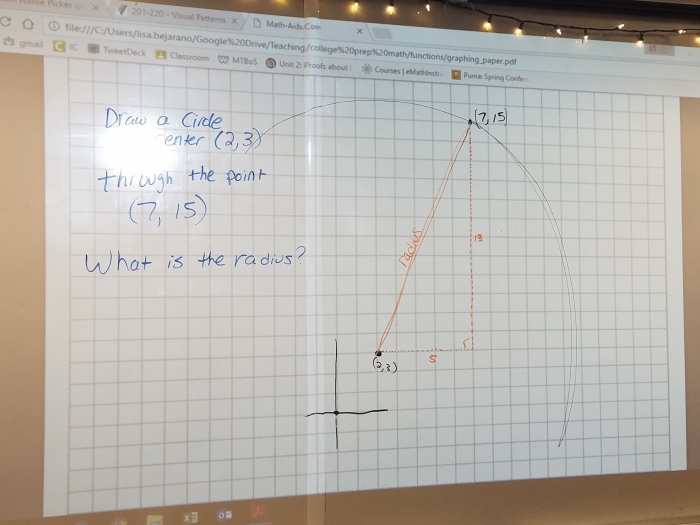
The next class period began by asking students to find the radius of a circle given the coordinates of the center and a point:
The vertical height of the right triangle should be 12, not 13! This was corrected during the class discussion.
We used this to determine the radius of this circle as (7 – 2)² + (15 – 3)² = 13²
After further discussion, students were able to generalize the equation of a circle centered at (h, k) to be: (x – h)² + (y – k)² = r²
Then students worked in small groups on the vertical white boards to complete the task included in the Shell center lesson: Sorting Equations of Circles 1
I printed and laminated the cards to make them easier to use on vertical dry erase boards and for facilitate discussion.
Finally, students completed the “Going Round in Circles, Revisited” sheet included in the lesson linked above.
7) Find the center and radius of a circle by completing the square
I created a foldable for students to summarize the equation of a circle that included examples of using completing the square to put an equation of a circle into a standard form. We followed this with additional practice.
<foldable below should be printed on legal sized paper>
Every time we referred back to completing the square I made visual diagrams connecting it back to their initial development of their understanding of how to complete a square. I never stated any shortcut like, “just divide by 2 and square it.” Students developed a genuine understanding of the process, which will hopefully lead them to increased success as they begin algebra 2 next school year.
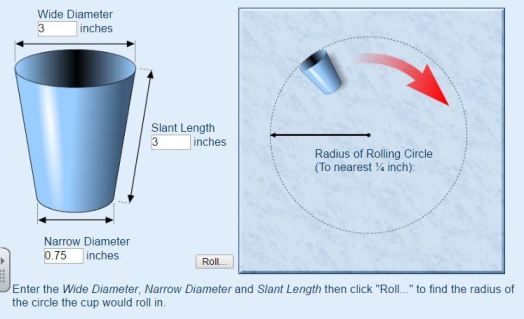
The Rolling Cups task from the Shell Center is a perfect geometry modeling project. I use some form of this task every year for the last three days of the first semester as a final project. This task incorporates constructions, similarity, functions and modeling while pre-assessing students readiness for next semester’s content: solids and circles.
I’ve discovered that this activity is most effective when I have students produce something each of the 50 minute class periods. Over the years, I have been collecting a wide variety of cups from Goodwill, which I keep in a giant tote in the basement of my school.
With finals complete and students’ motivation dwindling, Rolling Cups is the perfect way to make the most of the days right before break. I move all of the chairs and desks out of the way that we have a big open space in the middle of the class. I also make sure students can easily access the dry erase boards on all of my walls to encourage teamwork and collaboration (more on vertical dry erase boards).
Here is how I break up this activity-
Day 1: Experiment
Here are 4 cups. What will happen when I roll them? Which one will make the biggest circle? Which one will make the smallest? Try it.
I hand each student a different cup and this sheet below to guide their thinking and keep them on task, and then I get out of the way.
At some point during this class period I also show students the Rolling Cup Calculator. I put a link in Google Classroom for easy access. Most students use it on their cell phones to try to find patterns.
Day 2: Develop an equation
This is the formula derivation day. I start by not mentioning the cups at all and just playing a quick whiteboard game reviewing similarity.
During this task, I usually have a few students suddenly yell out:
“This is the cup thing!”…and then start sketching cups on their whiteboards and they begin to use similar triangles to determine the roll radius.
Here is a discussion I had with a student, trying to support their thinking:
Other students look at the first group like they are crazy and we just carry on.
Then I have a few students summarize what they’ve noticed from the previous class. Next I hand out this sheet: side 1 is the original task and side 2 is for students to write a few sentences summarizing their findings, and score themselves. My school has been working to develop a structure and rubric to elicit quality student writing about mathematics. Below is the current format.
As I present this sheet to students and summarize the expectations for the day, I also tell them that I made a deal with another teacher on Twitter and that I will be scanning their work and sending it to this teacher in Ohio.
I make a big deal about them not writing their names on the back of the sheet where they describe their thinking because that is the side I am going to send to Ohio and I want to preserve their anonymity. In return, I explain, the class in Ohio will be sending me their work, which we will look at tomorrow.
The quality of students work is so much better when they think it will be analyzed by someone else. Of course, this is a big fat lie. I don’t have any plan to send their work to another teacher. But they do so well with this added piece of motivation.
Day 3: Critique other students work
This day goes pretty much as described in the original task. Students review the included samples of other students work and analyze it answering the well written questions from the original task linked above.
It is fun for students to see that other students in other parts of the country approached the problem the way they did. They get excited and genuinely interested. They begin to reflect on their approach and compare it to the student work provided. You can see their confidence grow a little when they recognize that their (alternative school) work is just as good, if not better than the work of typical students in Ohio.
I am hesitant to share the files that I use because I’ve borrowed them from all over the interwebs and at this point I don’t even know where to give credit, but here they are!
[10/11/16 update: Most of this came from Elissa Miller. You can find even more awesome geometry resources on her blog.]
I usually start by having students deduce the properties of parallelograms using an old fashioned ruler and protractor. This is because I’ve noticed that students could use the practice. I know there are a lot of quadrilateral discovery activities on Geogebra, but I still think it is occasionally important to practice using different tools.
You can download a editable (word) copy of this sheet here.
After this task, I usually have students complete this checklist measuring, discussing and comparing properties of rhombi, squares, rectangles and parallelograms.
After these investigations and discussions, students work in pairs to complete an Always Sometimes & Never discussion of quadrilaterals, described here.
I also include some basic quadrilateral practice, like this assignment. It is just a good, basic, practice that helps expose student conceptions & understanding.
I’ve tried to explain why AngLegs are a must have for high school geometry and should not only be considered a tool for younger students. Here is an example of how I find them indispensable in teaching triangle congruence. This lesson is adapted from MARS: Evaluating Conditions for Congruency.
“Ok class, you are sitting in pairs and at each table is a bag of AngLegs. On the board I have written the question we are trying to answer for each of the scenarios I will present.”
“I made a triangle that includes a blue AngLeg. Can you make a different triangle that also has a blue AngLeg?”
“Make one. Hold it up.”
“How do you know that these triangles are different?”
“So, you are saying that keeping one side the same does not mean that the triangles must be congruent.”
Next, lets look at Card 3:
“I made a triangle out of a blue, a purple and a yellow AngLeg. Can you make a different triangle using the same three AngLegs?”
“What if you put them in a different order? …or move the purple between the blue and the yellow? Are you sure they have to be the same? How can you tell?”
Student: “The triangles still fit perfectly on top of each other”.
Student: “If the three sides on one triangle are the same as three sides of another triangle, then the triangles must be the same.”
Look at Card 7:
“How can you tell if an angle is the same in two different triangles?”
Student: “They fit perfectly on top of each other!”
“Is there a way to make these triangles so that they are not congruent?”
Student: “No way. These have to be the same”
Student: “Wait! I made two different triangles with all three angles the same and one side the same.” Does this count? Look!”
Student:”If two angles are the same, then the third angle always has to be the same because they add up to 180 degrees!”
“So what is the conclusion for this one?”
Student:”The triangles can still be different sizes, but their angles are all the same.”
“For the remainder of this class period, individually analyze card 5 and any other card, so 2 additional cards. Take good notes and write down your conclusions for tomorrow, where you will be randomly assigned a partner to complete the triangle activity. ”
From here the lesson continues as described in the SHELL center teacher guide linked above and described further in a blog post here.
Removing the hurdle of constructions allows students to focus on the learning goal for this activity: determining the minimum information required to guarantee triangle congruence, and what congruence means. It also connects nicely to congruence proofs through transformations as students are physically checking of the triangles fit on top of each other.
Last year I didn’t really teach proofs in geometry. It seemed so procedural and I knew it would take time away from more productive problem solving tasks.
I felt guilty for not including proofs in enough detail and I decided that this year I was going to teach it well.
Here is what I did:
Our unit began with the Shell Center task: Evaluating Conditions for Congruency, I don’t always follow these lessons exactly as described, but we focused on the Must the Two Triangles be Congruent? part of this lesson. I found that this activity is much smoother and more effective when using AngLegs instead of trying to draw each triangle (described here and here).
After this task we formalize our findings in our notebooks documenting which combinations guarantee congruent triangles [SAS, SSS, ASA, AAS] and which do not [SSA, AAA].
Next students practice determining if pairs of triangles must be congruent based on the information given. I am careful to include a few with overlapping triangles and triangles who share a side or contain vertical angles to generate observations and class discussions. At this point I address the reflexive property and vertical angles as reasons sides or angles may be congruent. I follow up any student observations of congruency with “How do you know?” or “Explain why you decided these two angles must be the same.”
Review definitions of midpoint, bisector, perpendicular, then a few images where I ask if you are given this information, what can you conclude is congruent. See the interactive notes here. This is the day students complete their first few **Really Basic** congruent triangle proofs.
Prior to this class I printed Proof Blocks on colored paper and laminated them, then I used masking tape to affix them to whiteboards. Once class began I randomly assign student pairs and had them work on a wall mounted white board (Vertical non-permanent surface) with a set of Proof Blocks at each work space.
.
Next I project a proof and students copied the image onto the whiteboard, then marked the givens, saw what else they could determine was congruent, and decided if they had enough information to conclude and prove that the triangles must be congruent.
In order to make sure all students got timely feedback and to hold them accountable, I gave each group an index card and when they finished a proof I would check it. Once it was done well, they got a stamp on their card. At the end of class they turned in their index card with their names & stamps on it, similar to the review activity I described earlier.
I returned to this format with the proof blocks and different pairs about once per week after learning and incorporating new skills. The second half of the slides above were from a day after learning and practicing angles formed by parallel lines & a traversal. I intend to create new “blocks” as we advance through the school year. Next week students will prove that all triangles have a sum of 180 degrees and that base angles of isosceles triangles are congruent using the same format.
With students standing at white boards, they can glance around and see their peers work easily, they are more likely to collaborate, and the whiteboard & Proof Blocks make it much easier to adjust their work when there are any corrections required.
I just graded students quizzes over this unit and it is the first time in my 12 year teaching history that they did very well on the first attempt!
Last year I wrote a post about how I wanted to improve my teaching of geometric constructions this year.
This year, I re-read it and used it to help plan this unit better. I never provided the students with steps to make constructions! It was tempting, but I resisted the urge, and they did great!
Here is the sequence that I followed and plan to use next year:
Day 1 – Play with http://sciencevsmagic.net/geo/ see how many of the challenges you can complete. I then had students submit a screen shot of their completed challenges through Google Classroom.
Day 2 – I assigned the construction design project described in my previous constructions post (and linked below). [credit for the designs: Mr. Baroody]
I gave the students compasses and paper to experiment and relate this to the computer task yesterday. They had to complete this at home. There was no discussion of “constructions” just making designs precise and accurate. Here are some students final designs:
Days 3/4 – Working in pairs, students alternated roles for each level of Euclid, the game with one student operating the laptop and the other writing down the steps they used to complete each level. We only completed up to level 6. These steps became their notes for constructions.
(Note: there is a geogebra constructions tutorial here.)
Day 5/6 – Construction station rotation – I randomly assigned groups and students rotated with their groups through different stations completing paper and compass constructions, using Popsicle sticks as their straightedges, so they couldn’t rely on measurements. They used their notes that they developed from playing Euclid the game. Sometimes they noticed that their notes were not sufficient, but since they had new partners, they would compare and add notes & diagrams as needed to improve their descriptions.
Day 6 – Constructions extensions. I asked them to apply their knowledge of constructions to new tasks, such as finding 1/8th of a segment, constructing a equilateral triangle and constructing a rhombus.
Students were so much more proficient at using a compass than at the end of this unit last year!
I think I need to develop more construction extension challenges to build on their basic skills next year. I may make a list of challenges and assign point values to them and then assign a total point value that they can get a variety of ways.
Please comment with any ideas to improve this sequence of tasks as an introduction to constructions that builds student confidence while supporting their creativity and problem solving.


 Students developed a genuine understanding of the process, which will hopefully lead them to increased success as they begin algebra 2 next school year.


 “How can you tell if an angle is the same in two different triangles?”


